Getting Started
Let's set up a GitHub profile with dynamic content using dōteki in less than 5 minutes.
Initial setup
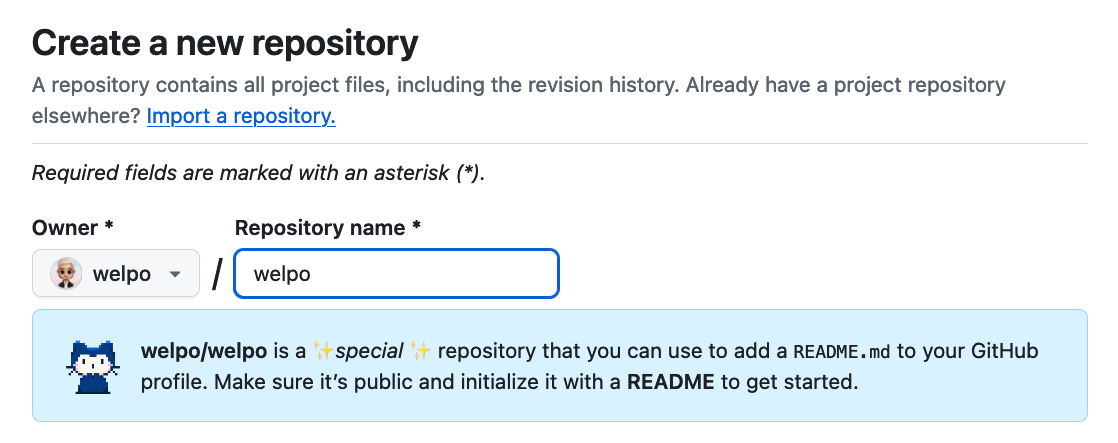
First, create a new public repository with a name that matches your GitHub username:
In the root of the repository, you'll need to two files: a configuration file and a README.md file. Let's clone the repository and create the files:
# Replace `welpo` with your GitHub username.
git clone https://github.com/welpo/welpo.git
cd welpo
The contents of the README.md file will be shown on your GitHub profile. Here you'll need to add sections with markers (invisible HTML comments) so dōteki knows where to place the content generated by the plugins. For this example, let's add recent blogposts and the current date:
## Latest blog posts

<!-- blog start -->
<!-- blog end -->

<sub>Last updated on <!-- last_updated start --><!-- last_updated end --></sub>
The configuration file tells dōteki which plugins to use and how to configure them. Create a doteki.toml file in the root of the repository with the following content:
[sections.blog]
plugin = "feed"
url = "https://osc.garden/atom.xml"  # Replace with your feed.

[sections.last_updated]
plugin = "current_date"
inline = true
Each set of markers in your README.md must have a matching sections.<name> entry in doteki.toml. If your markers were <!-- personal_blog start --> and <!-- personal_blog end -->, the corresponding entry in the configuration file would be [sections.personal_blog].
The setup is complete! Now we need to run dōteki to generate the content.
Running dōteki
If you plan on using the GitHub Action, you can skip this section.
You can run dōteki locally after installing it with pip:
pip install doteki[all]
Once installed, you run dōteki from the root of the repository:
doteki
This will automatically find doteki.toml and README.md in the current directory and update the sections in the README.md file.
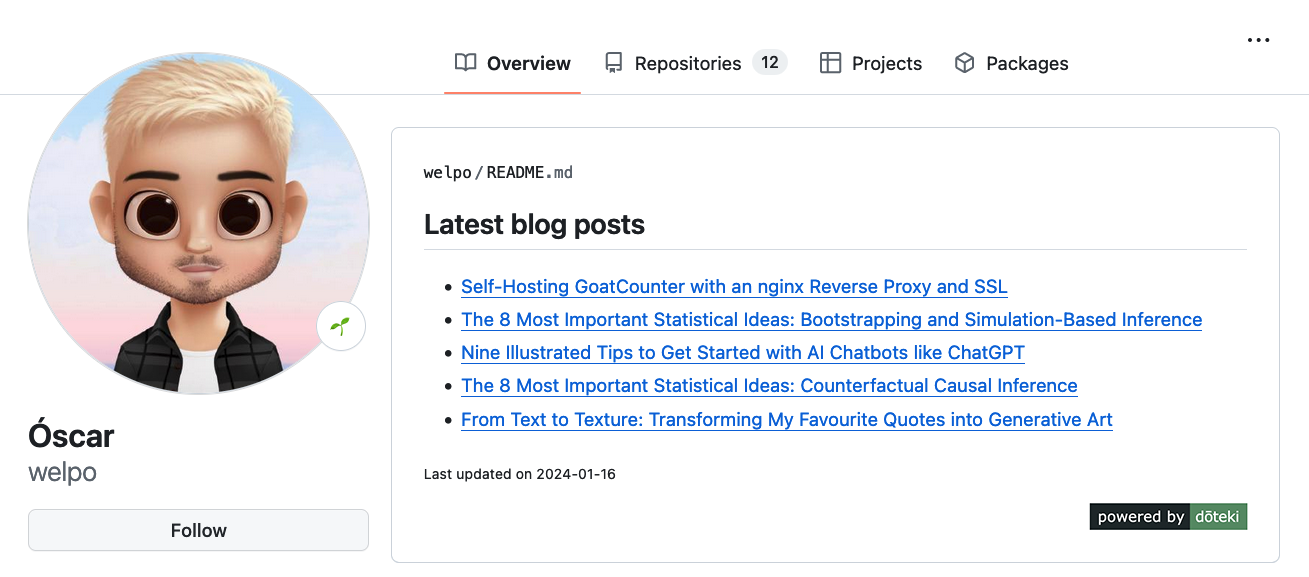
Result
After pushing the changes to GitHub, your profile would look like this:
Automating the process
Whether you want to do this on a schedule or on every push to a repository, there are a few ways to automate the process.
GitHub action
The simplest way to run dōteki automatically is to use the GitHub Action.
In short: create the workflow file .github/workflows/doteki.yml with the following content:
name: Update README with dōteki

on:
  push:
  workflow_dispatch:
  schedule:
    - cron: '51 * * * *'  # Every hour at XX:51.

jobs:
  update-readme:
    runs-on: ubuntu-latest
    permissions:
      contents: write  # Necessary to push changes.
    steps:
      - name: Run dōteki action
        uses: welpo/doteki-action@main
        env:
          GITHUB_TOKEN: ${{ secrets.GITHUB_TOKEN }}
This will update your profile every hour at XX:51, whenever you push to the repository, or when you manually run the workflow.
For more information, see the doteki-action README.
Cron job
You can configure a cron job to run dōteki locally on a schedule and push the commit.
Run crontab -e to edit your cron jobs and add a line like this:
51 * * * * cd /path/to/repo && /full/path/to/doteki && git add README.md && git commit -m "Update README" && git push
Important:
- Use the full path to dōteki.
- Change
/path/to/repoto the path of your repository. - On macOS, grant
/usr/bin/cronFull Disk Access. See this stackoverflow answer for more information.
This will run dōteki every hour at XX:51 and push the changes to GitHub.
Webhooks
If you want to update your profile on every push to a repository (say, your blog's repository), you can configure a webhook to run dōteki on every push.
This is a bit more involved, but if you're already using a webhook for building your site (here's a guide for Zola and GitHub), you can just add dōteki at the end of the build process.
Further reading
Check out the list of plugins to see what you can do with dōteki.
See Plugin Configuration for more information on how to configure plugins.